HyperBDR 5.6.x - 5.11.x Upgrade Guide
HyperBDR 5.6.x - 5.11.x Upgrade Guide
Enhanced Performance with Next-Generation Transport Protocol
HyperBDR introduces a revolutionary user-space transport protocol in the latest version, delivering superior stability and reliability compared to traditional kernel-space mechanisms. This advanced protocol significantly reduces transmission interruptions and failures, especially in challenging network conditions, providing users with an enhanced disaster recovery experience.
Important: Due to compatibility considerations with existing block storage modules, users must upgrade both the HyperBDR control console and deployed agents (no uninstallation required) to enable this new transport protocol.
This guide presents two upgrade paths from HyperBDR 5.x to the latest version:
- In-Place Upgrade (Configuration preserved, user-friendly approach)
- Complete Reinstallation (Recommended, streamlined process)
Note: Both approaches require full data synchronization after upgrade completion.
Option 1: In-Place Upgrade
Resource Configuration Cleanup
- Deregister disaster recovery machines and reset them to the second configuration step, awaiting reconfiguration after the update process
HyperBDR Update
SSH into the HyperBDR control console host
Due to directory structure changes in version upgrades, perform the following operations before starting the upgrade:
## Create venv directories
mkdir -p /opt/installer/production/venvs/atomy-s3block-venv
mkdir -p /opt/installer/production/venvs/SwiftS3Block-venv
mkdir -p /opt/installer/production/venvs/hyper_up-venv
## Initialize version numbers
echo "0.0.0" > /opt/installer/production/venvs/atomy-s3block-venv/version
echo "0.0.0" > /opt/installer/production/venvs/SwiftS3Block-venv/version
echo "0.0.0" > /opt/installer/production/venvs/hyper_up-venv/version
## Reset version numbers
rm -rf /opt/installer/production/config/supervisor-dashboard/VERSION/versions.json## Remove invalid directories
rm -rf /opt/installer/production/venvs/scripts-venv/version_info/- Follow the official upgrade guide for installation: View Guide
Cloud Sync Gateway Update
Gateway versions below 6.2 do not support iterative upgrades. After updating to the new version, rebuild the cloud sync gateway:
- Delete all iSCSI gateways and transition host images
- Remove iSCSI gateways from the interface
- Delete Cloud_SYNC related security groups from the cloud platform
- Deploy S3 gateway
Sync Proxy (Hamal) Update
SSH into the sync proxy host
Initialize version number
# Create hyper_exporter directory
mkdir -p /opt/hyper_exporter/
# Initialize version number
echo "0.0.0" > "/opt/hyper_exporter/exporter_version"
Download the latest upgrade script
Replace <HyperBDR IP> with your HyperBDR control console host address
curl -k -o /usr/local/hyper_exporter/update_sync_proxy.sh https://<HyperBDR IP>:30080/softwares/update_sync_proxy.shGrant execution permissions
chmod +x /usr/local/hyper_exporter/update_sync_proxy.shExecute the upgrade script
# Navigate to script directory
cd /usr/local/hyper_exporter/
# Execute upgrade
bash update_sync_proxy.sh -y
Update configuration
CONFIG_DIR="/opt/hyper_exporter"
sed -i '/^ServiceType/d' "/config.ini"
echo "ServiceType = hamal" >> "/config.ini"
Restart monitoring module
systemctl restart hyper_exporter
Agent Update
Linux Agent
SSH into the source agent host
Initialize version number
# Create hyper_exporter directory
mkdir -p /usr/local/hyper_exporter/
# Initialize version number
echo "0.0.0" > "/usr/local/hyper_exporter/exporter_version"
Download the latest upgrade script
Replace <HyperBDR IP> with your HyperBDR control console host address
curl -k -o /var/lib/egisplus-agent/upgrade_agent.sh https://<HyperBDR IP>:30080/softwares/upgrade_agent.shGrant execution permissions
chmod +x /var/lib/egisplus-agent/upgrade_agent.shExecute the upgrade script
# Navigate to script directory
cd /var/lib/egisplus-agent/
# Execute upgrade
bash upgrade_agent.sh
Update configuration
CONFIG_DIR="/usr/local/hyper_exporter"
sed -i '/^ServiceType/d' "/config.ini"
echo "ServiceType = linux_agent" >> "/config.ini"
Restart monitoring module
For older operating systems (CentOS 6, RHEL 6, Ubuntu 14.04 and earlier), SysV init may still be used. Use the service command for equivalent operations.
 # systemd systems (recommended)
 systemctl restart hyper-exporter-agent.service
 # Legacy systems (SysV init)
 service hyper-exporter-agent restart
Windows Agent
Log into the Windows source host
Download the latest upgrade package based on your server configuration
Replace <HyperBDR IP> with your HyperBDR control console host address
x86
https://<HyperBDR IP>:30080/softwares/windows-agent-new/upgrade_x86.zipx64
https://<HyperBDR IP>:30080/softwares/windows-agent-new/upgrade_x64.zip
Extract the downloaded ZIP file
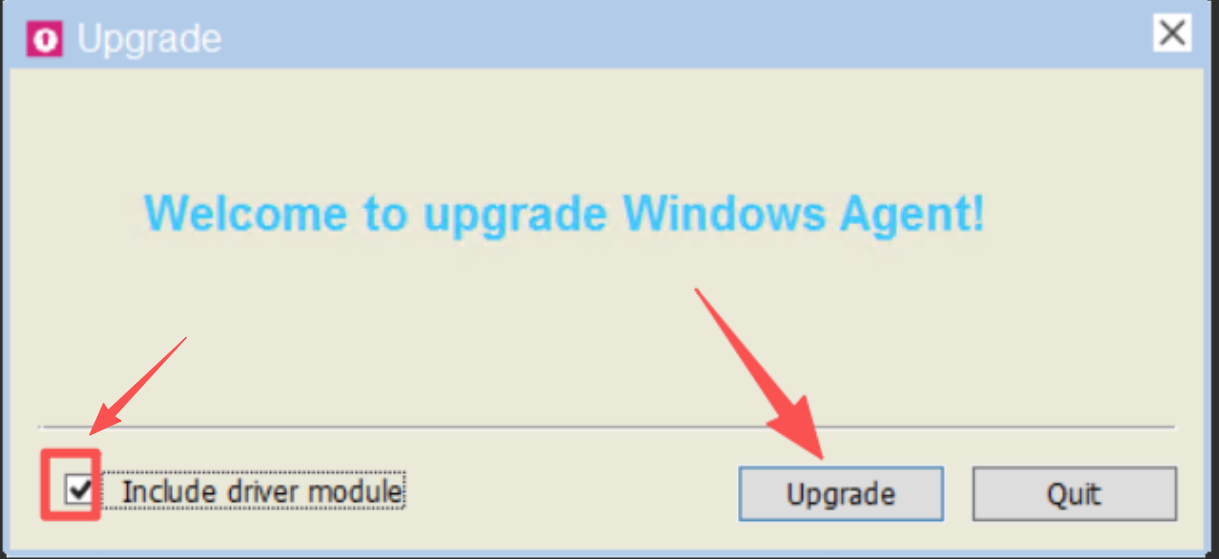
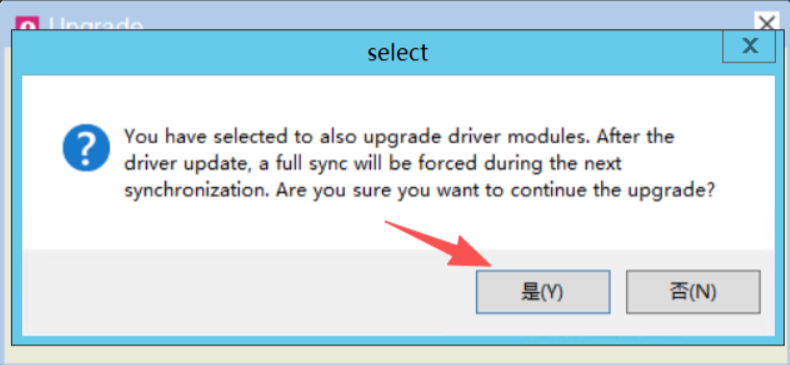
Right-click and run Upgrade.exe as administrator, following the prompts to complete the upgrade
Update configuration
# Adjust path based on actual installation directory
C:\Program Files (x86)\DiskSync-Agent\hyper_exporter
# Edit config.ini file, add to the last line
ServiceType = windows_agent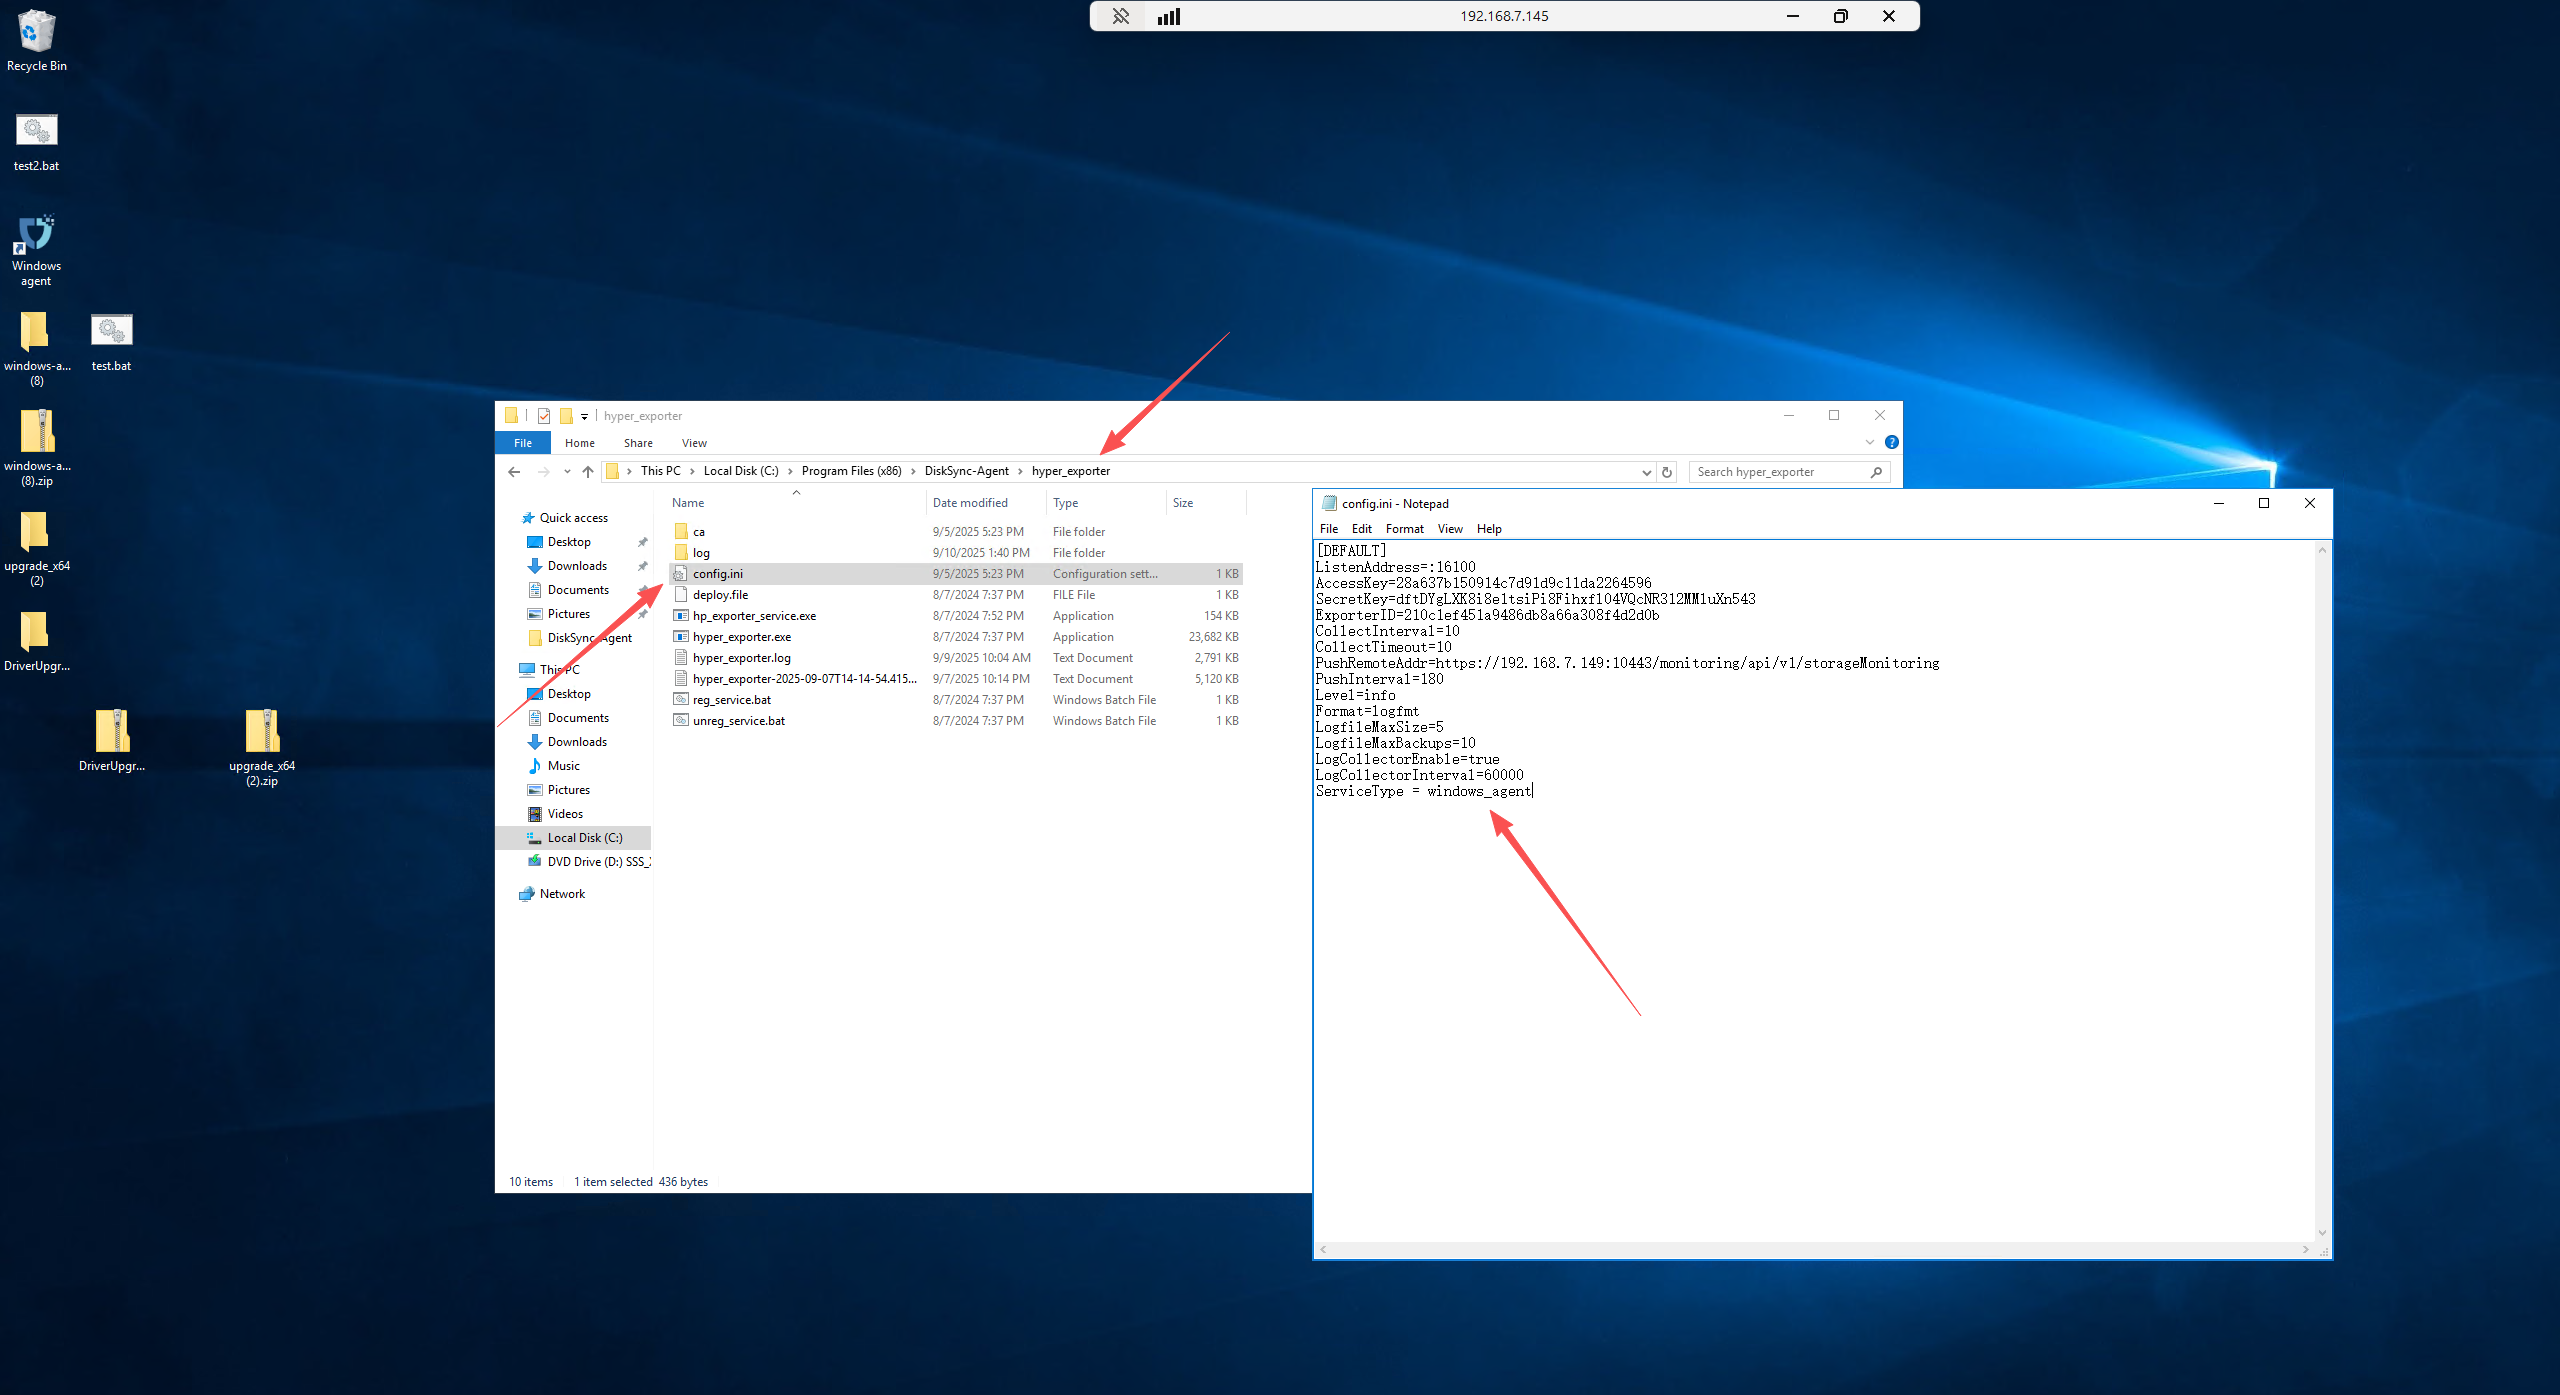
Restart the Agent program
Upgrade Verification
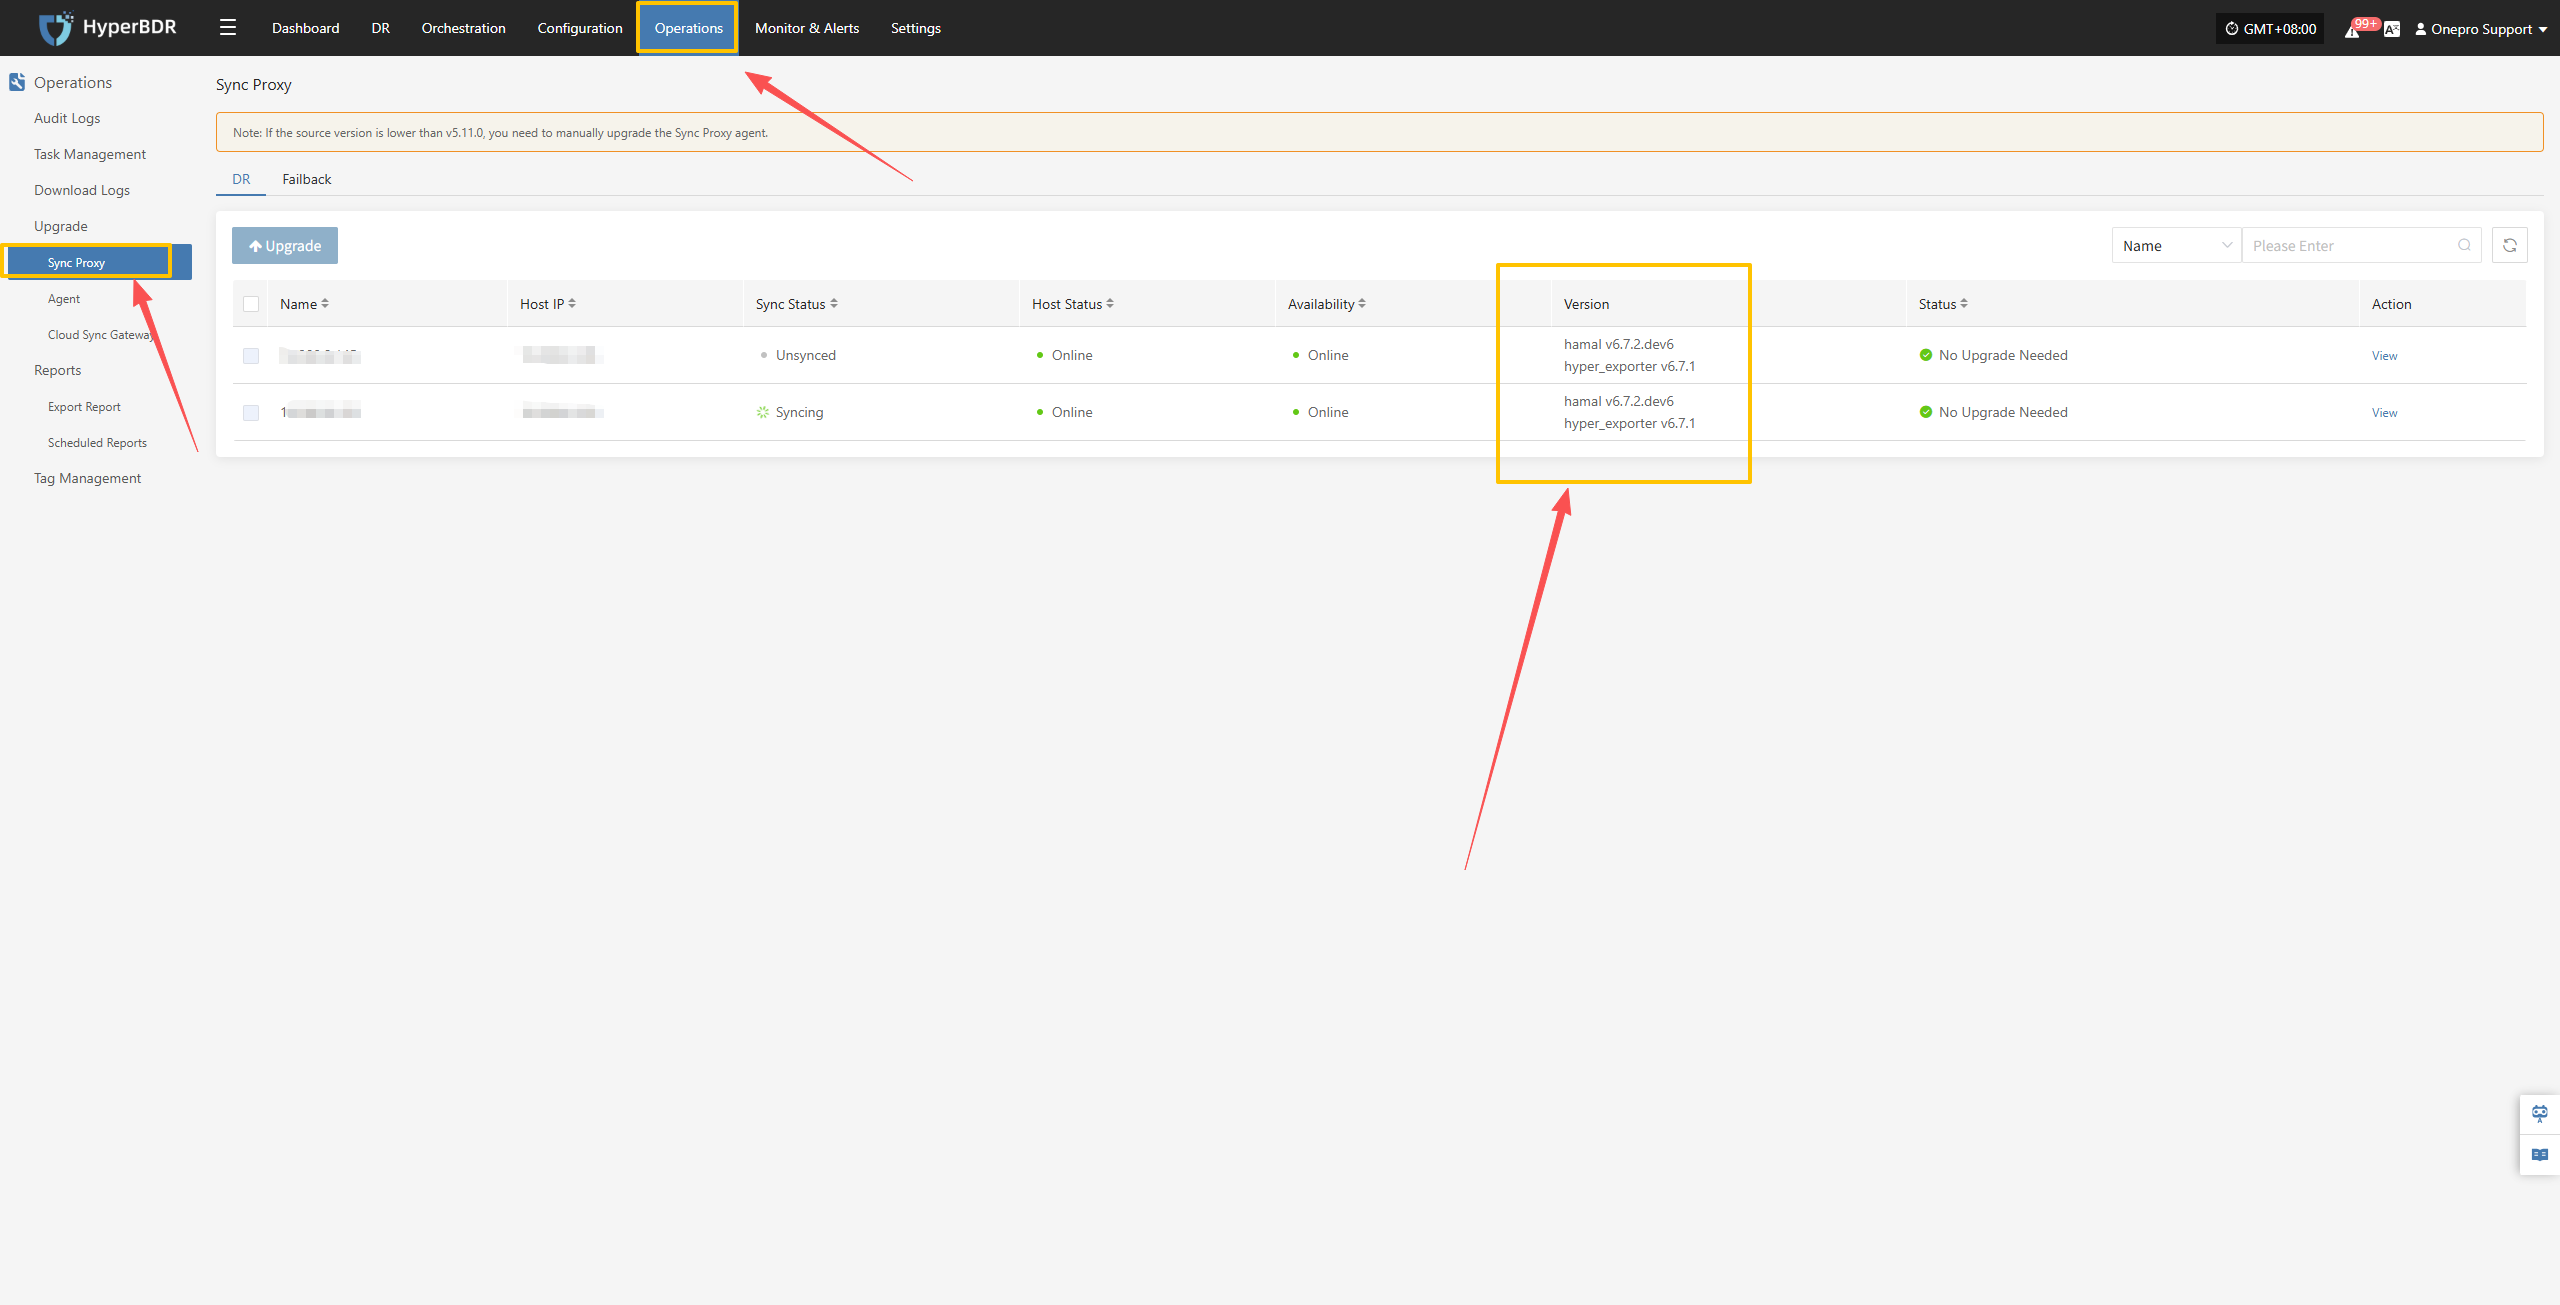
Log into the HyperBDR interface to view version information, refer to the official FAQ: View FAQ
Log into the HyperBDR interface to verify Agent and Agentless version availability
Full Data Synchronization
Reconfigure storage settings and initiate data synchronization. For detailed instructions, refer to the HyperBDR product manual:
HyperBDR Manual: View Guide
HyperMotion Manual: View Guide
Option 2: Complete Reinstallation
Environment Cleanup
Log into the HyperBDR console
Clear related resource configurations based on interface information:
Host Resources (deregister hosts as prompted):
Configuration Management Production Site Configuration Source Sync Proxy
- Reference official documentation: View Guide
Resource Disaster Recovery Host Disaster Recovery Select Host
- Reference official documentation: View Guide
Resource Disaster Recovery Host Disaster Recovery Disaster Recovery Configuration
- Select hosts to deregister Action Deregister Host
Resource Disaster Recovery Host Disaster Recovery Start Disaster Recovery
- Reference official documentation: View Guide
Storage Configuration (unbind block storage and object storage configurations as prompted):
Configuration Management Storage Configuration Object Storage
- Reference official documentation: View Guide
Configuration Management Storage Configuration Block Storage
- Reference official documentation: View Guide
Log into Linux hosts
- Uninstall existing Agent programs: View Guide
Log into Windows hosts
- Uninstall existing Agent programs: View Guide
HyperBDR Update
- Follow the official upgrade guide for installation: View Guide
Reinstall Cloud Sync Gateway
- Complete block storage configuration: View Guide
Reinstall Sync Proxy
- Complete production site configuration: View Guide
Reinstall Agent
Install Agent programs
Linux hosts: View Guide
Windows hosts: View Guide
Reinstallation Verification
- Reference official FAQ: View FAQ
Full Data Synchronization
Reconfigure host resources and storage settings to initiate data synchronization. For detailed instructions, refer to the HyperBDR product manual:
HyperBDR Manual: View Guide
HyperMotion Manual: View Guide